WASM SYNTH, or, how music taught me the beauty of math
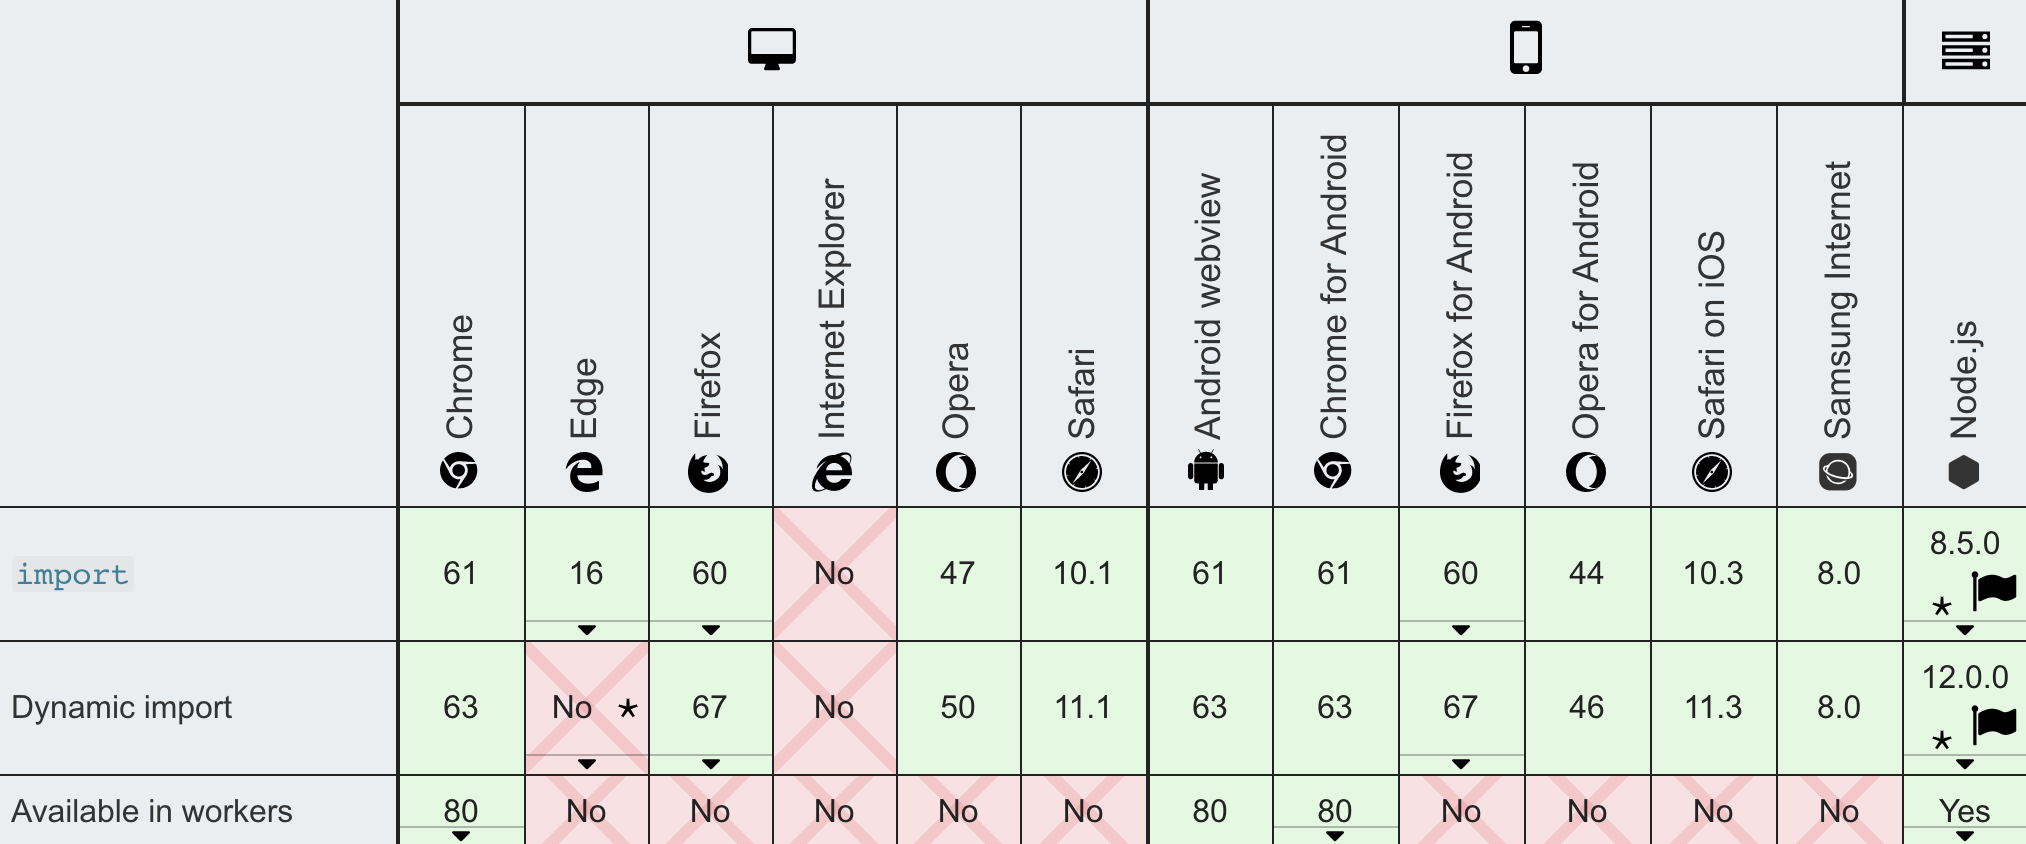
TL;DR: I built a synthesizer using C++ and WebAssembly. Check out the finished product (browser compatibility table), the source, watch the talk or keep on reading the article!
The Presentation
Introduction
Ever since I started taking piano lessons two years ago, I was curious to take a look into a vastly different field from cryptocurrencies and blockchain. That field being digital audio engineering. So when some of my freelance projects ended in November 2019, I decided to allocate my next three months towards building an audio product.
I quickly discovered what I wanted to build: A synthesizer. In C++! I had just watched some talks on WebAssembly, and was very curious to learn a new language too! In hindsight, the personal challenge, however, was to understand the data structures and math that go into generating audio.
That's the story of how I rediscovered the beauty of mathematics through building a synthesizer with C++ and WebAssembly.
Theory
I had never done anything in the field of music technology - I had to start at zero practically. It meant I had to look at the physical, mathematical, and musical fundamentals of audio generation.
The Nyquist-Shannon Sampling Theorem
Sound is a time-dependent phenomenon. Regular instruments take advantage of this phenomenon by emitting sound waves over time through, e.g., a mechanical part oscillating. That produces a time-continuous analog signal, which means that for each point in time, the signal produces a unique value in amplitude. Computers can merely approximate analog values by sampling them into time-discrete values. They're so good at approximating that the digital representation of an analog signal virtually becomes indistinguishable to a human's ear. As long as the sampling complies with some basic rules of signal processing, at least.
A pretty fundamental principle in this regard is the Nyquist–Shannon sampling theorem. It states that to capture all necessary information from a continuous-time signal, a function "sampling" the signal needs to record data at least at a rate twice as frequently as the highest frequency. If this requirement is unfulfilled, then the resulting digital signal contains an artifact called "Aliasing", distorting the familiarity of the original signal (Listen to this sound bit of aliasing happening on a sawtooth wave).
Though we're not planning to record analog signal to digital, we'll still have to comply with this theorem, as synthesizing sound is nothing more than filling a list with time-discrete values too5. Practically, it may look something like this:
1 | // Simple pseudo code noise generator |
Here, we're initiating a new AudioContext object,
getting its sample rate, and generating enough samples to have the noise
last for at least one second. Admittedly, the Nyquist-Shannon theorem is
less of a problem here, as the sampleRate is likely to be
set to a reasonable value by our pseudo language's magical
AudioContext. But assuming it was set to only 200 Hertz,
outputting a piano's middle C (its frequency is 261.6256
Hertz) would already be corrupted, as the required 261 repetitions
per second to output middle C wouldn't fit into the 200 repetitions per
second of the sample rate. Practically, what would happen is that our
sampling algorithm would be "overtaken" by middle C's frequency and
hence output a shifted version. The figure below nicely visualizes the
effect, showing what happens if we're gradually increasing the signal's
frequency at a steady sampling rate.
But assuming a sufficient sampling rate, there's another problem with the above code. Imagine, we substituted the noise-producing snippet with a nice-sounding sine wave and then integrated and sold it as a hardware synthesizer. When pressing a key, the player would hear the respective tone for a second. Pressing another key, they'd hear another tone for another second and so on. But since we built our function only to generate static-length tones of a one-second length, it wouldn't be much fun making music, as playing rhythmic patterns would be impossible!
That's because music doesn't work on an absolute time scale, but on a relative one. We wouldn't say that a note "lasts for a second". Instead, we'd say it "lasts for a quarter bar" and, hence, call it a "quarter note". To build a software instrument, this means that we'll have to optimize for real-time responsiveness and maximum expressiveness. For this, we'll need specific data structures.
Frames and Ring Buffers
Generally, audio in programming languages is most commonly generated by continuously filling up buffers with data points and then sending them to the sound card. But as we've just learned, that buffer's size determines the responsiveness of our instrument. An idea that nicely dissolves this problem is to chunk our buffer into frames. Instead of sending a fixed-length buffer of samples to the output device, we chunk it into small frames and continuously send these. In theory, we'd limit the size of a frame to a single sample for maximum responsiveness, meaning we'd now be "streaming" our data. But given that timing is crucial too, we'll have to come up with yet another strategy for sending just the right amount of data in a given time frame. For this, we can use a different concept called a "ring buffer".
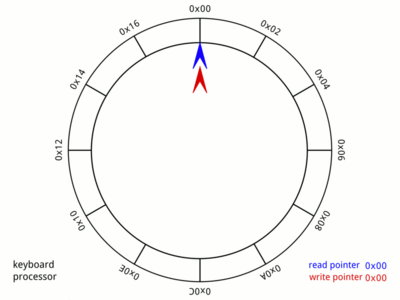
A ring buffer is a fixed-size list, managed by two distinct pointers, where one pointer is writing values, and the other one is "chasing" and consuming those values. It allows a program to continuously stream data, precisely at the speed of the chasing pointer. Additionally, it provides developers with a "pull" rather than a "push" API. Now, instead of having to optimize their program to push new frames to the output device periodically, a developer can use the callback function of a ring buffer's writing pointer to be notified about a shortage of fresh data.
But so much for theory. Let's explore how we can implement these concepts in practice.
Implementation
As we've discussed the most important theoretical concepts in the previous section, we can now move into the implementation phase. Specifically, we'll highlight three distinct issues that we had to overcome.
Using the AudioWorklet
Today, there's sadly no cross-browser API fully implementing all the
above concepts. That requires some improvisation when trying to
build a synthesizer for the web. Naively, one might think that
setTimeout and setInterval allow one to
implement a ring buffer quickly. However, their accuracy can't
be trusted1. Alternatively, there's the web audio
API's ScriptProcessorNode.
And while it allows hooking into the output device's streaming process,
it still requires a push approach, as inserting just the right
amount of samples per second into the output stream is kept to the
developer. Additionally, ScriptProcessorNode has been
deprecated without any reasonable cross-browser compatible alternative
available since 2014. Yikes!
So
what now? Luckily, ScriptProcessorNode's deprecation
happened years ago already. Since then, the browser vendors have worked
on an alternative, called the AudioWorklet.
Encouragingly, it implements what we described above; a pull
interface4 spawned in a separate thread (hence
Worklet) for lag-free audio processing.
Let's convert our previous code snippet to an
AudioWorklet:
1 | class NoiseWorklet extends AudioWorkletProcessor { |
And take a closer look! First, we extend our class with the
AudioWorkletProcessor interface class and implement the
mandatory process(inputs, output, parameter) function.
process allows us to access all currently available audio
inputs and outputs and process them.
We won't have to add them to the function's return
statement, as we're manipulating them by reference. Conveniently,
process is called for us by the AudioWorklet
every time the output device needs data.
In terms of understanding, it really helped me think of the
AudioWorklet as a ring buffer. It's implementation isn't a
ring buffer. But that metaphor served me well for getting a better
intuition.
An important detail to consider is that, at the time of writing, the
AudioWorklet API is, sadly, only supported by a handful of
browsers. A polyfill
is available. As its master branch and npm release were buggy though, I
had to submit a PR
first before being able to use it. Thanks, Google Chrome team.
Eventually, I got everything working cross-browser and was able to move on to more exciting things!
The Math of Audio Generation
One of the most daunting tasks of the project was having to deal with the math to generate audio. After all, the last time I had worked with frequencies was back in high school physics class and, more recently, in some computer science lectures. In all honesty, though, I had to start from scratch as I had forgotten almost everything! So for this section, I'll establish a particular formula in great detail as creating it was necessary to come up with a functioning product.
I began by playing around with sine waves in jsbin.com and quickly realized that I had to go back even further, by, for example, looking up the definition of a frequency and by researching the period length of . Spoiler: It's .
The first actual mathematical problem I encountered was when I tried to render a tone for a given MIDI key dynamically. MIDI keys are tuned by assigning each note to an ascending integer. This integer can then be run through a formula to receive the respective frequency in Hertz. Notes exist as frequency values for waveforms. The MIDI formula I found defined:
"So can there be a formula to produce samples given a MIDI key number?", I asked myself. And even though I was a bit overwhelmed after my first mathematical research, I was able to come up with something useful. Given a sample rate and a 440 Hertz pitch, there's a function for approximating a sine wave for an MIDI key at a time interval :
😱 It looks complicated! But let's take a closer look to see whether we can simplify it. First off, I think it's important to know the intention behind designing this function. As I said, it's purpose is to generate sample values given a MIDI key number. We just learned that there's a formula to generate a frequency value from a MIDI key index. And in fact, we can see that is contained in the divisor of .
But how can we render a sine wave with a specific frequency? Well, we already know that the length of one period is . From math class, we might also remember that we can stretch and compress the period of by multiplying by a factor , so . Meaning, that we can define the period length of by finding the relation between and :
Knowing this relation already gives us some information on how to produce several samples for a sine wave with a given frequency. Let's say we wanted to produce a 1 Hertz sine wave at a sample rate of 48 kHz for 1 second2. Well, then now we'll somehow have to generate 48000 samples from .
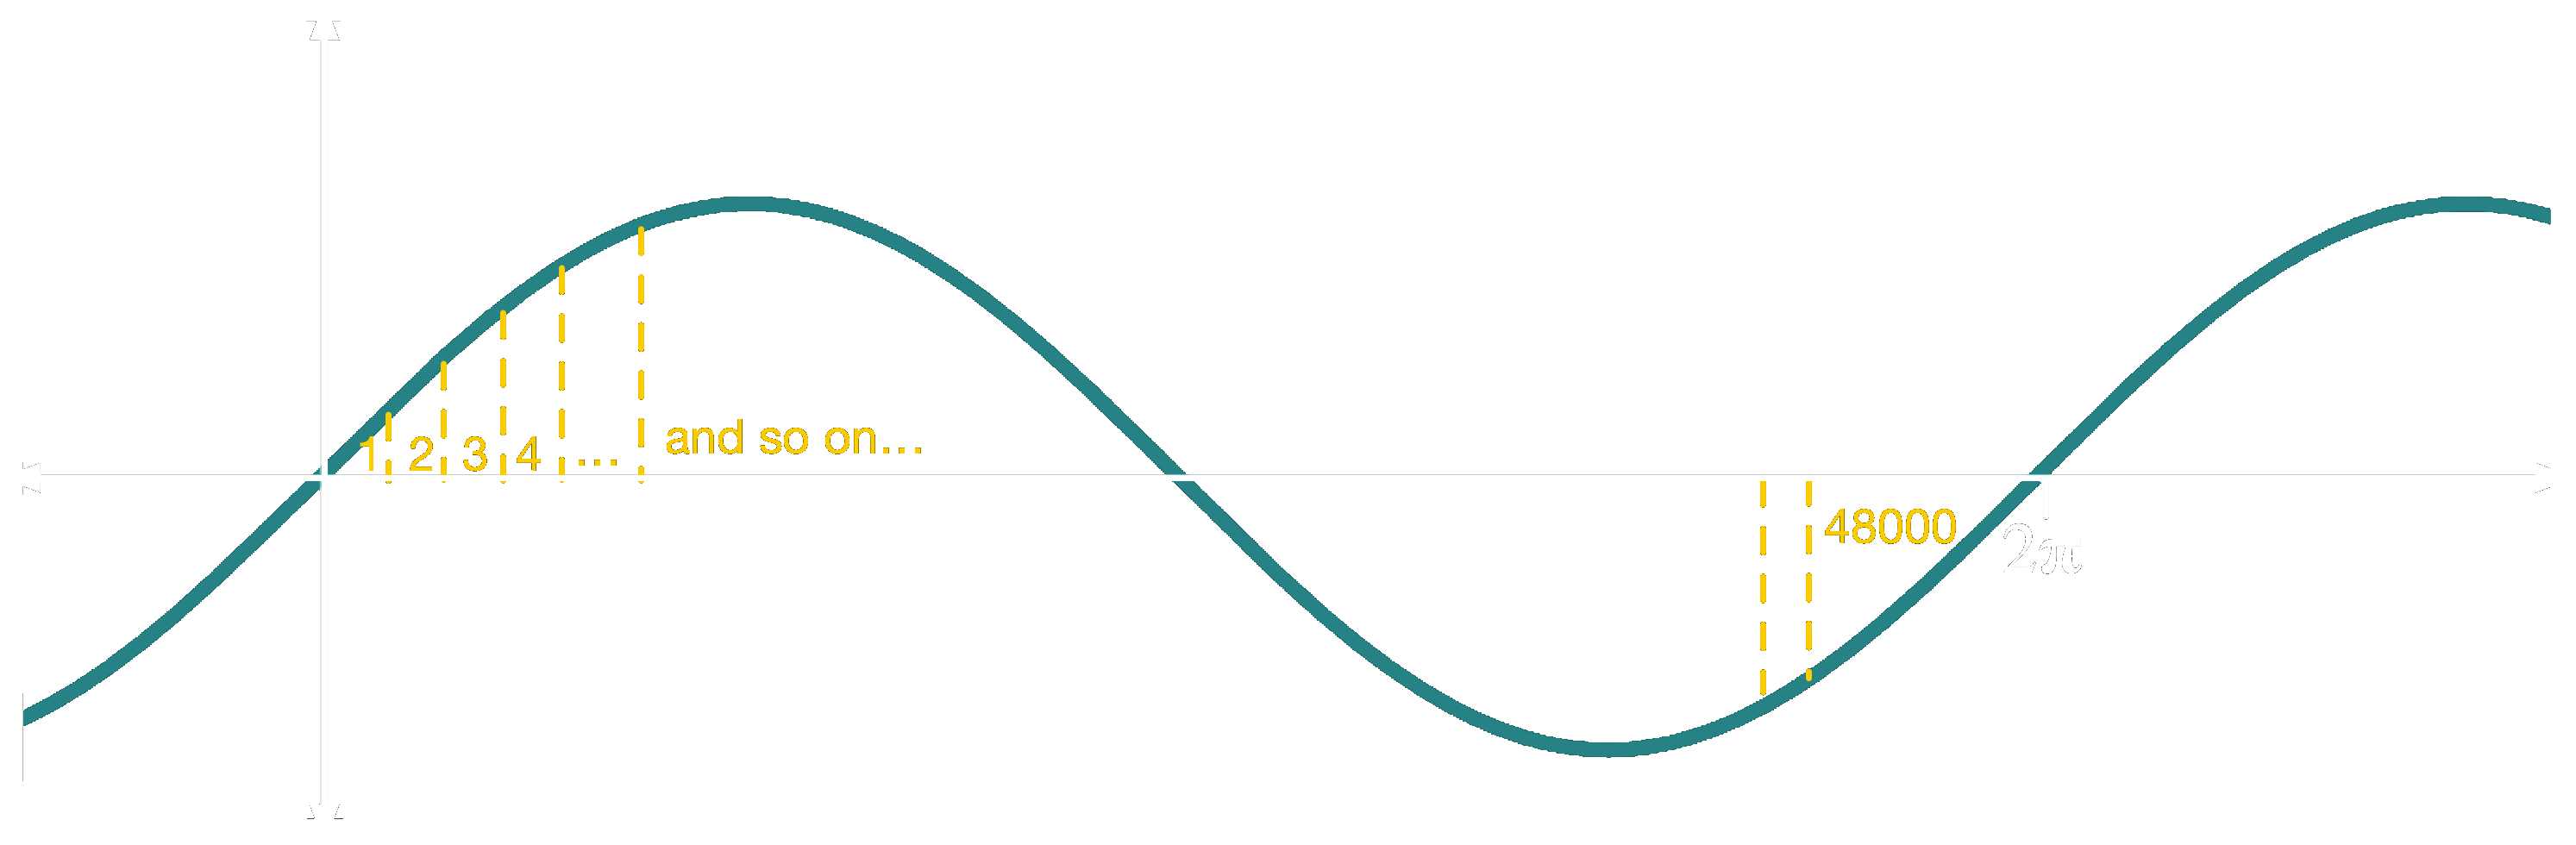
Two approaches come to mind: Either stretch the period length of so that we can simply input integers between and or shrink relatively such that when we're closing in on samples generated when we reach on the x-axis.
As we've already defined our period length formula , let's go for the former approach. Meaning that if we want our period length to be to use ascending integers as input for , we can shuffle to solve for :
Great! Remember, we said earlier that the period of could be scaled using the factor . That means we can now define a function to generate samples:
where we can replace accordingly to introduce the sample rate (we just renamed ) as a factor:
Generating an arbitrary frequency is now possible too! Say we wanted our sine wave to cycle 10 times per second more, we'd simply have to adjust our period length by a factor of ten to receive a frequency at 10 Hertz.
We can just replace this factor by our MIDI-key-to-frequency function :
Et voila, we just created a function that can produce samples at an arbitrary sample rate from a MIDI key number !
After creating this first formula, I had passed the local mathematical-insecurity hump, and proudly ventured ahead, trying to solve more elaborate problems!
Working with WebAssembly and C++
Finally, I feel like I need to say a few things in this post about WebAssembly and C++ too. It turns out, that was the most natural part! Yes, being a JavaScript developer, C++ looked foreign at first, and I was a bit scared of pointers, and the raw-ness C++ radiated. But, overall, it wasn't entirely new territory for me as I already understood many of its concepts from previous projects (e.g., working with the shell or Ethereum Solidity). To kickstart development, I bought "Accelerated C++" by Andrew Koenig and Barbara E. Moo. I read parts of it but then dove fully into coding. The book is excellent. I can recommend it!
The same goes for emscripten and WebAssembly. There are a few gotchas, and I'm writing about one particular in the Appendix of this post. Overall, WebAssembly's tooling is already surprisingly usable and easily integrated into a standard front end build pipeline.
I had initially decided on C++ and WASM for the performance boost. Now, I take much more joy out being able to separate my code base by concerns nicely. Writing all audio code in C++ and all user interface code in JavaScript led to a loose coupling and nice modularization. I noticed that I not only wrote a fully-fledged audio library in C++ through this but also that it's portable to anywhere WebAssembly runs! That's super cool!
Lessons Learned
WASM Synth turned out to be a great learning experience. Working as a developer in the same field for many years, it's sometimes easy to forget how amazing the brain reacts to learning new things. In November, after having worked on smart contracts and decentralized apps for more than a year, I wasn't much confident anymore in cutting my teeth at math. I felt like I stood no chance in succeeding in writing a program outputting audio. But spending some time doing it, I noticed once again that, like most human-made things, they're limited in their complexity and that enough time-allocation and intrinsic motivation help immensely permeating them.
The math involved, parts of which I outlined in this post, really put me out of my comfort zone. But finally, spending time working towards a practical solution helped me fill in the gaps in my knowledge. In the future, I'd like to make an even more conscious effort involving more of it in my daily coding!
Lastly, the thesis that many concepts can be mastered playfully by reverse engineering their core problems once again proved to be right, but probably not unchallenged for too long as I'm looking for new projects putting me out of my comfort zone (hire me3).
Resources
- WebAssembly
- emscripten: A toolchain to compile C++ to WASM
- Step by step guide on how to use emscripten
- Tutorial on how to manage memory in WebAssembly
- Example on
passing a
Float32Arrayback and forth between JS and C++ - Emscripten alternative: cheerp
- Embind alternative: nbind
- Continuous Deployment with emscripten on Travis CI
- Human-Audio Interaction
- Audio Engineering:
- Piano Key Frequencies
- Nice forum post with links to audio engineering resources
- Cool website for DSP nerds
- Career advice on how to become an audio engineer
- Thesis of someone that also built a synth in C++
- Advanced audio engineering theory slides
- MIDI protocol specification
- Another MIDI protocol specification
- Web MIDI and Ableton Live API interaction
- Demo of using the Web MIDI API in the browser
- Most useful blog of all! Person that builds software synth in C++!
- Step by step tutorial on how to build an oscillator in C++
- Math
- Music Theory:
- Web Audio API:
- MIDI synth project
- Slides about the Web Audio API
- Collection of Web Audio Synths
- WebAudio API implementation for Node.js detailing gain up and down ramping
- Explanation on the relationship of Gain and Decibels in the WebAudio API
- Person complaining about the Web Audio API
- Super useful polyfill for the Web Audio API
- Misc:
Appendix
The emscripten Build
Pipeline
A question I had before working with emscripten was: "How do I integrate WebAssembly into my regular web app build, without bloating it too much?". To put things into perspective: I had just recently switched from Webpack to rollup.js as I was sick of spending hours setting up Webpack with its ten thousand magic configuration options.
To my surprise, however, neither framework has reasonable defaults for handling WebAssembly yet. Notably, when we generated the WebAssembly outputs using emscripten and they grew bigger than 4KB. But there were other problems too:
- rollup.js bundles all source file into a single JavaScript file.
- Booting the app, also means booting react.js, which itself starts a continuous process that we'll somehow have to take into account.
- emscripten generates a
.wasmand a.jsfile. The.wasmfile contains all C++ source code as well as WebAssembly instructions. The.jsfile acts as the glue between WebAssembly and JavaScript.- In some cases, there's this 4KB size limit on loading
.wasmfiles - The emscripten
.jsglue code is super useful. I can recommend including it into your code deliverable.
- In some cases, there's this 4KB size limit on loading
- The
AudioWorkletis supposed to be included into the page by usingnew AudioContext().addModule(<path>)- It has a separate global scope. But emscripten's glue code relies on
the global scope too (
Moduleobject)
- It has a separate global scope. But emscripten's glue code relies on
the global scope too (
- Rollup.js doesn't have good defaults or plugins for bundling
emscripten-generated
.wasmcode.
In the end, this led me to build a custom pipeline to bundle emscripten builds every time my source changed. But before I explain how, let's take a step back to understand how emscripten's compilation works.
On installation, emscripten exports a command-line utility called
emcc into the shell. To demonstrate its capabilities, let's
try compiling the Hello World example from the beginning of
the post:
1 |
|
To make it executable by a browser, we'll use emcc to
compile it to a .wasm and a .js file.
1 | $ emcc main.cc --bind -WASM=1 -o main.js |
emcc here simply compiles all functions contained in
main.cc into a main.wasm file. Besides, it
also generates this glue code (main.js) using Embind.
It allows us to invoke functions, initially written in C++, directly
from within JavaScript as if they were just regular classes. So to make
emscripten's outputs work correctly, we'll have to include the
.js into the page. On the initialization of the page,
emscripten's clue code is loading the .wasm file
asynchronously. Through some trick, the browser skips the 4KB file size
limit, and all our C++ classes are now available as native JS
classes:
1 | <html> |
So far, so good. But, as I've mentioned previously, one of the
problems now is that the AudioWorklet, being spawned in a
separate thread with a separate global scope, won't be aware of
emscripten's window.Module. So how do we export code from
within a Worklet?
After spending quite some time researching that question, I
discovered that the Google Chrome Labs team recommends
transpiling all JavaScript source into native
modules and then simply use ES6's import from syntax.
Well, it turns out the JS modules syntax isn't
widely supported yet, particularly not in Workers, let
alone Worklets...
But luckily, after banging my head another few days against JS modules and other fancy new front end frameworks, I found a surprisingly simple trick.
I reduce emscripten's outputs to a single .js file that
contains the .wasm as base64 string using it's
-s SINGLE_FILE=1 option. As we need emscripten's
.js file to define window.Module in the
AudioWorklet's global scope, I then simply append the
emscripten JavaScript file with the AudioWorklet'
JavaScript file to make them configure the same global scope. That
allows me to execute WebAssembly from within a Worklet without using the
poorly supported import from syntax. Ultimately, I ended up
with the following bash script (or on GitHub):
1 |
|
To update the page every time the source changed, I additionally used
npm-watch
to re-run the routine each time file changes occur.
Footnotes:
1: I couldn't find a specific reason for why
setTimeout and setInterval are inaccurate. I'm
suspecting it has to do with JavaScript's event loop. Please let me know
if you have more details. ↑
2: 48 kHz is the standard audio sampling rate used by professional digital video equipment ↑
3: Yes, you can hire me! I've written something about myself here. Also, check out my projects page! TL;DR: I'm a Senior JavaScript dev that is looking for remote or Berlin-based work in the fields of music, blockchain/cryptocurrencies or both! Please reach out via email ↑
4: In a previous version of this post, I claimed that the AudioWorklet was essentially implemented as a fancy version of a ring buffer. Paul Adenot from Mozilla gladly made me aware that this is incorrect. He referred me to this section of the Web Audio API W3C Editor's Draft for more accurate information. ↑
5: Or is it? I've talked this through with a bunch of friends and colleagues of mine and so far I've had trouble finding a good arguments for why that should or shouldn't be. ↑
6: After writing this article, I had a very interesting conversation with a senior engineer at Ableton and he explained to me the difference between "jitter" and "latency". The key difference being that one is deterministic and the other one isn't. But since we had this conversation at a very "late" point of the evening, I don't dare to recite everything he said here. ↑